Build the Ultimate Truck Bed Sleeping Platform for Truck Camping
In this post we’ll walk you through the build process for our truck bed sleeping platform as part of our DIY truck bed camper build, including everything from design choices to finished assembly.
If you’re not yet sure if pickup truck camping is right for you, check out our post on how we became a truck camping family for some inspiration, or head over to this post - Everything You Need to Know About Truck Bed Camping - to see practical info on how to get started.
Or if you’re not entirely sure which sleeping platform option may be the best for your build, head on over to our post on choosing a truck bed sleeping platform.
And if the prospect of building your own truck bed sleeping platform seems completely overwhelming, know that we felt exactly the same way - having literally no prior experience with design or carpentry.
But all you need is a little time, patience, and the right tools and you can do just about anything.
There’s a LOT of info in this post, just take it slow - You can do it!
If a printable PDF of all the diagrams found below would help you in your build, you can print them at the bottom of the post.
*(This post contains affiliate links. This means we may receive a small commission, at no additional cost to you, if you make a purchase through a link. See our full disclosure.)
Defining Needs
The truck shell camping platform is the foundation of any DIY pickup truck camping build.
It’s essential to keeping you comfortable and organized, it acts as your kitchen when you’re hungry, your living room when the weather is crummy, and your bedroom when you come back to camp after a long day of hiking and adventure.
Essentially, it’s what makes your truck camping rig a home.
So when we decided to turn our 84 Toyota Pickup into the ultimate DIY truck shell camping adventure mobile, we knew we had to put a lot of thought into what we wanted out of our sleeping platform.
The list was daunting, but we knew we wanted:
Enough space to sleep 2 (plus a rapidly growing toddler) to 3 people comfortably
A pickup truck camping platform strong enough to still be used to haul things when not in use for truck camping - while also being removable if need be
Built in stove
Built in storage for propane
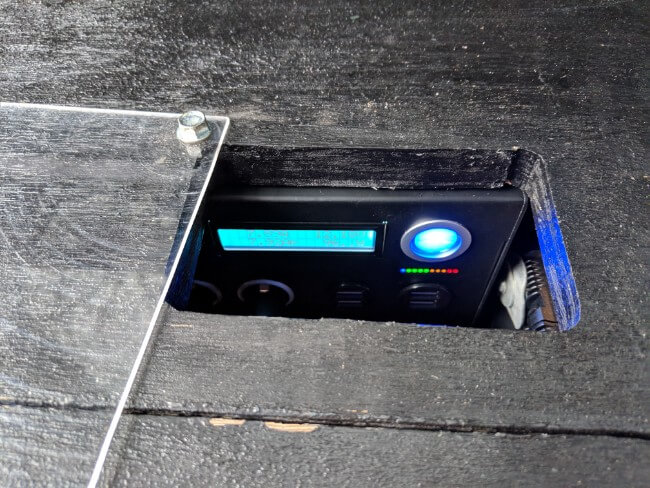
Built in storage for a Dual Battery Setup using our Inergy Kodiak Solar Generator
12V charging ports for cell-phones & laptops
Space for a 12V Camping Fridge
Somewhere to store dirty gear, shoes, etc.
Water storage**
Storage for long items - namely my Tenkara fly rod and our camp chairs
Drawer storage for all our kitchen, camping gear, and clothing that would make everything easily accessible
Enough headroom to still be able to sit up comfortably
**we ended up finding exterior solutions for these
Eventually we were able to create a design to integrate ALL these things into our truck camping build.
Designing the Ultimate Truck Shell Camping Sleeping Platform
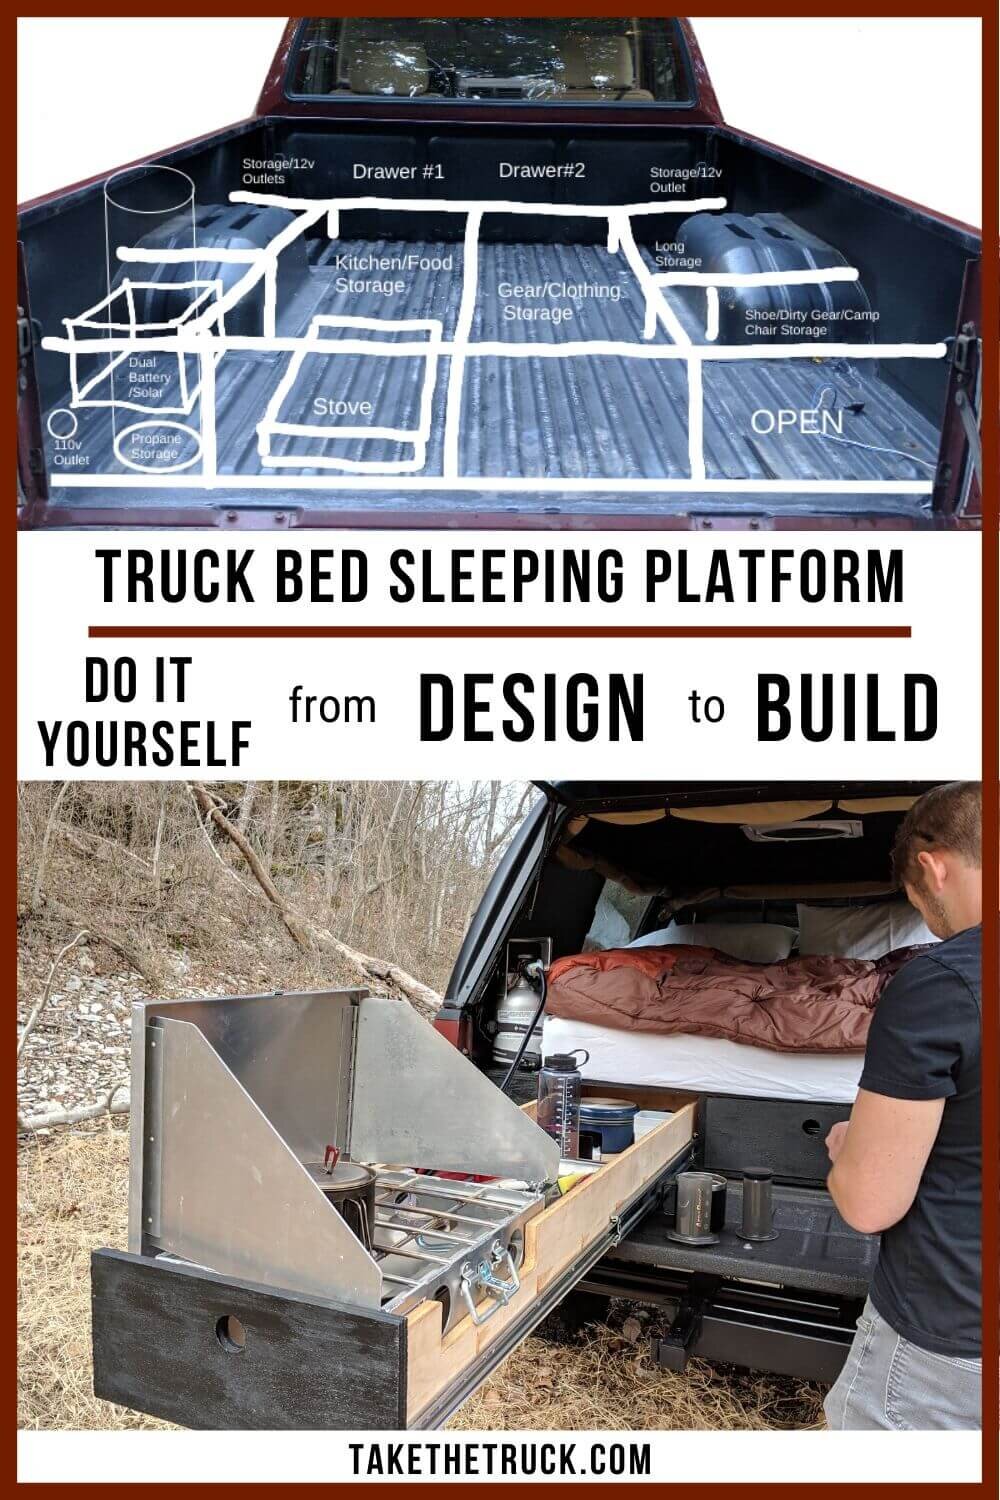
After hours spent sitting in the pickup truck bed dreaming about the possibilities, we created this very rough design and began taking measurements and gathering materials and tools.
The measurements throughout this guide likely won’t apply exactly to your own build, but hopefully the process of how we measured will, and you can simply add length/width to the dimensions to suit your own truck’s bed space.
BONUS: If you’re a Toyota Pickup or even Tacoma owner these measurements should be very close to your own because Toyota didn’t change the 6ft bed layouts all that much over the years.
Materials:
4 - 4ftx8ft cabinet grade 3/4in. plywood boards - we used red oak (not the lightest option)
1 - 500 piece box of 1 ¼ inch Kreg Jig screws*
2 Sets - 60” long 500lb rated drawer slides* (for a total of 4 separate slides)
1 - box #8 1/2 inch self-tapping screws (for attaching the drawer slides)
1 - box #10 1/2 inch self-tapping screws (also for attaching the drawer slides)
Tools:
1 - Kreg Jig Kit* with Clamp*
This was a game changer for executing our truck bed sleeping platform build and drawer system - this is a MUST HAVE tool if you’re carpentry noobs like us
Circular Saw or Table Saw
Jig Saw
Variable Speed Drill/Bit-Driver
Speed Square* and 48” T-Square* (great for making nice square cuts on long pieces of plywood)
Defining Terms:
Because we are for all intents and purposes complete carpentry noobs, throughout this guide we’ll make references to the below non-technical terms in order to help clarify parts of the assembly process.
Kreg Jig Joint - this is a wood joinery method using a tool called a Kreg Jig that allows you to easily and securely join wood using a drill and Kreg Jig screws - It’s like making your own DIY Ikea furniture!
Vertical Kreg Jig Joint - when a Kreg Jig Joint is used to secure something vertically (i.e., up and down, perpendicular to the ground)
Horizontal Kreg Jig Joint - when a Kreg Jig Joint is used to secure something horizontally (i.e., side-to-side, parallel to the ground)
Toenail - this refers to alternating the Kreg Jig joints from one side of a board to the other so that the screws enter at opposing angles
Now it’s time to Measure, Measure, Measure, (yeah probably one more time), Cut, Kreg Jig, and Assemble!
Measuring the Truck Bed Footprint
First we outlined the footprint of the truck bed to calculate how much space we had to work with and roughly how much plywood we would need.
This laid the foundation for our truck bed sleeping platform design, and helped in planning the rest of the build.
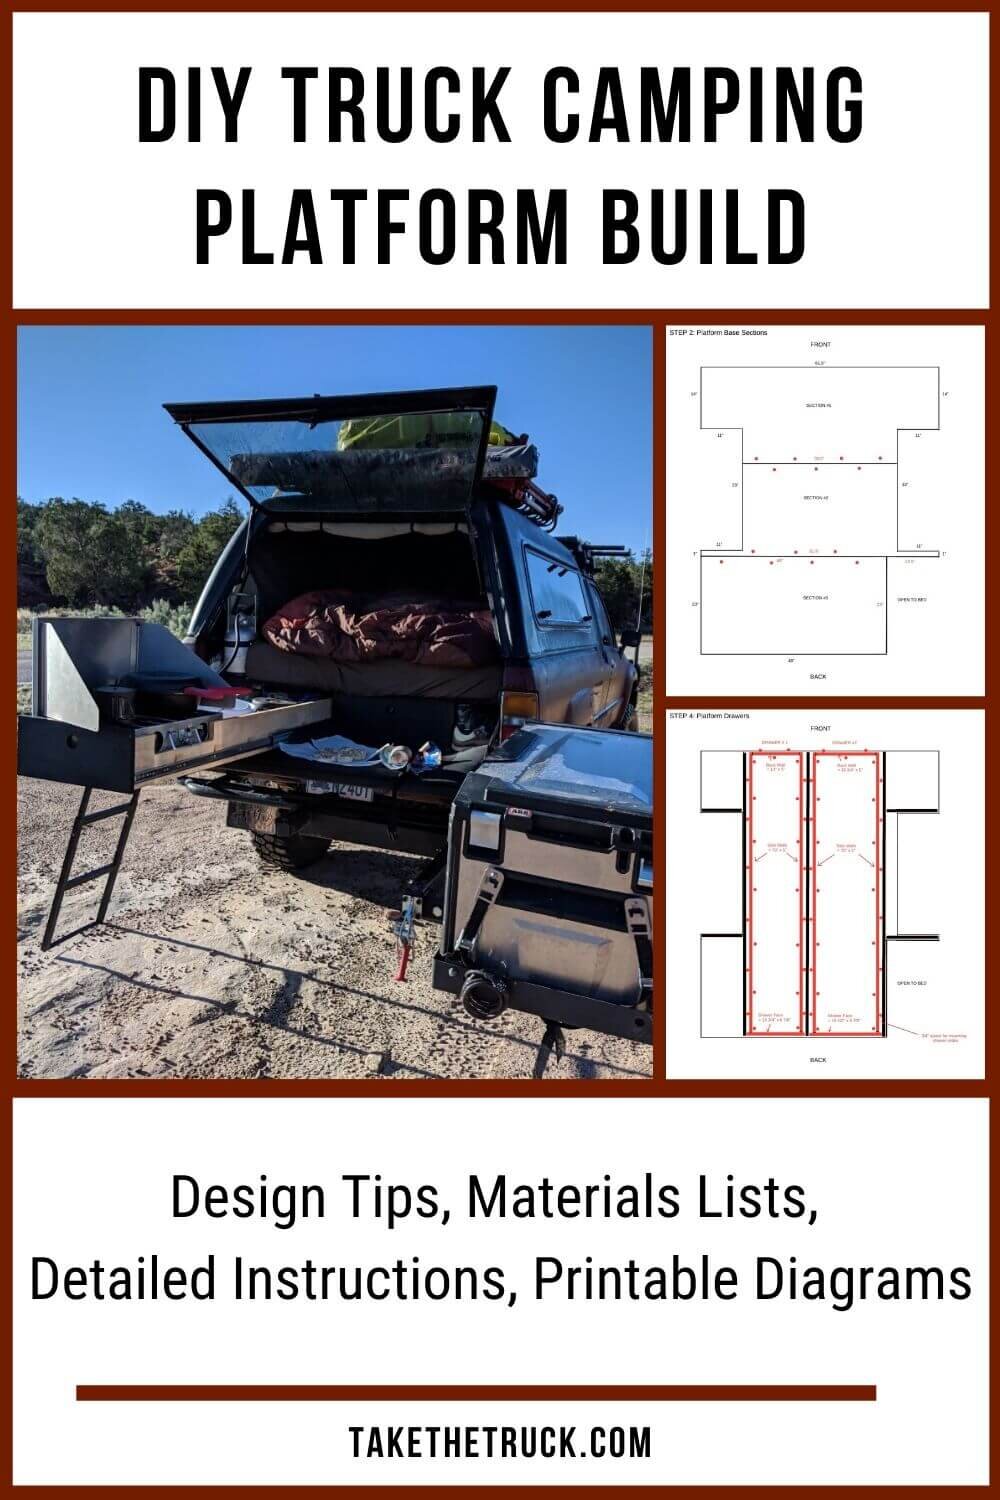
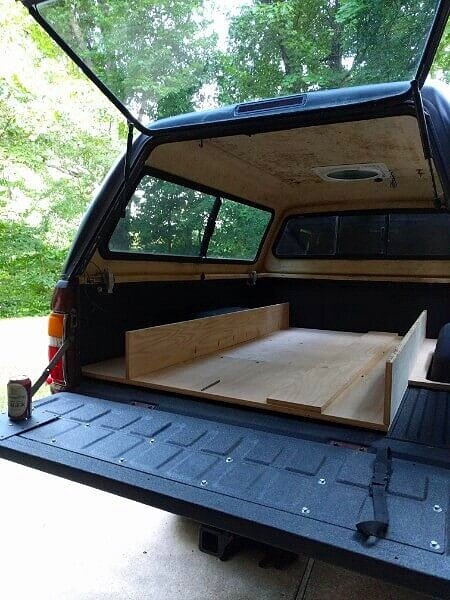
Making the Truck Bed Sleeping Platform Base
We decided to place a ¾” plywood Platform Base on the bed of the truck to provide a nice level foundation to build the platform on, and by dividing the Platform Base into 3 sections it makes it easier to fit into the bed (and remove if needed) with the camper shell still on.
These 3 sections were cut from one 4x8 piece of plywood.
Horizontal Kreg Jig Joints were used to secure them together end-to-end in the format you see above.

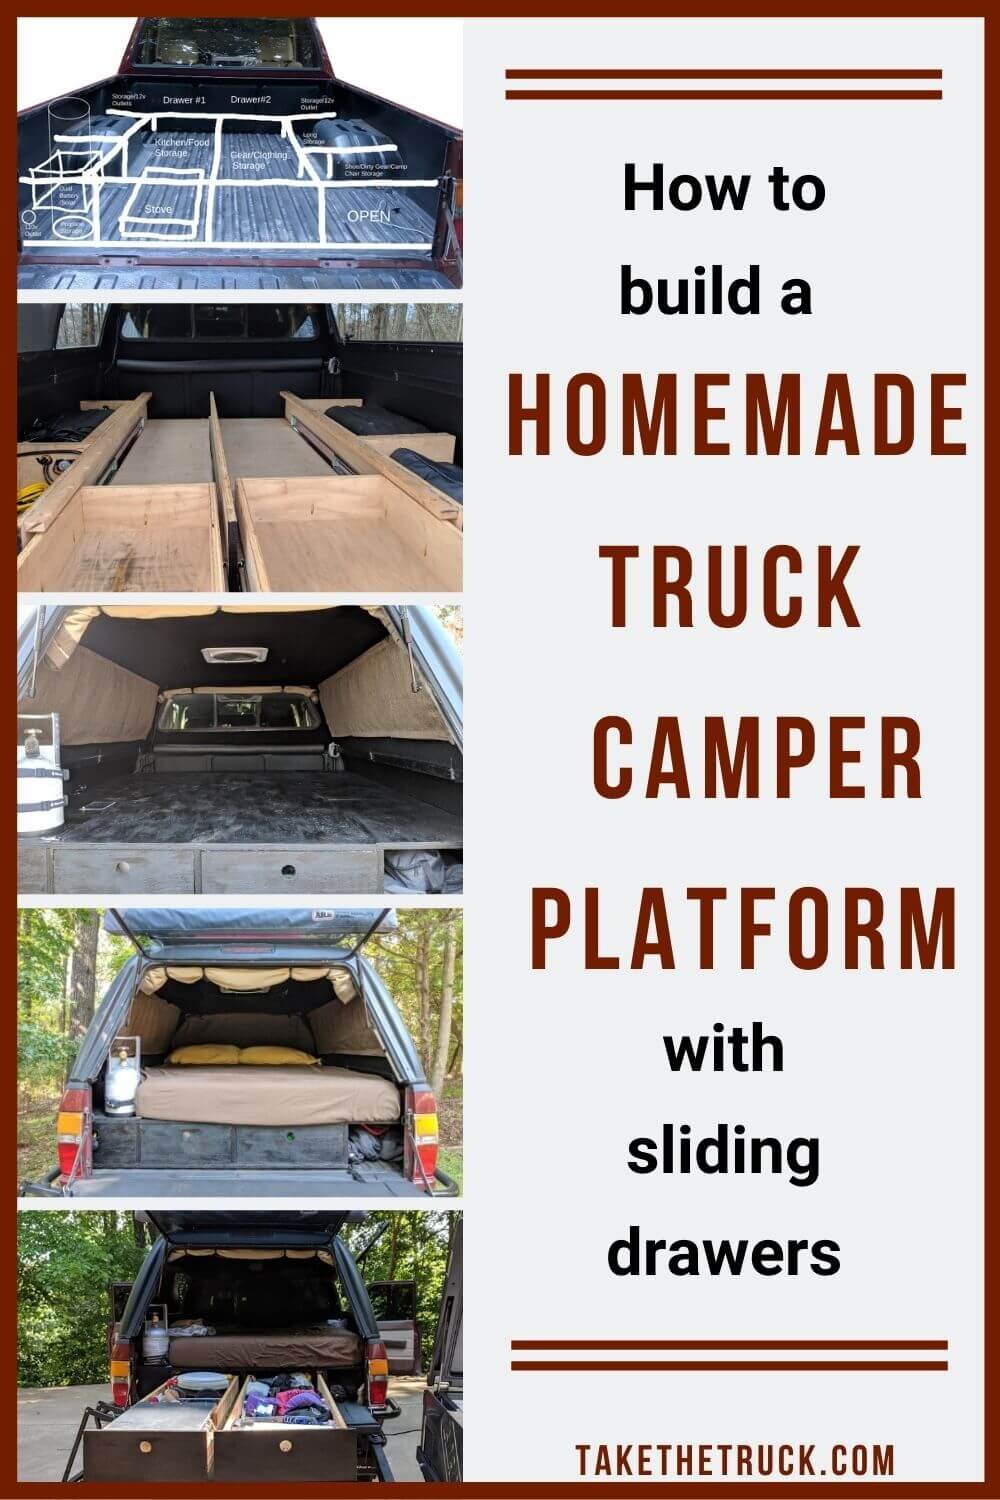
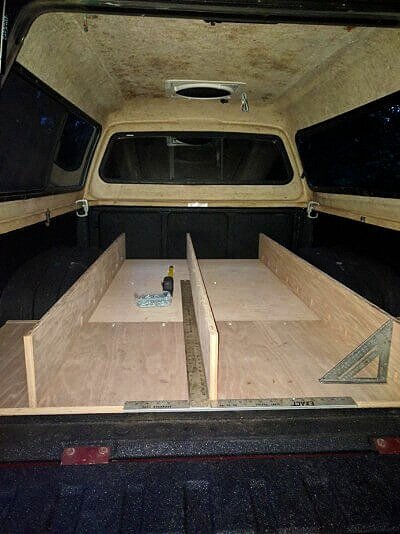
Building Truck Bed Sleeping Platform Supports
For our build we wanted the top of the platform to be level with (or to basically rest on top of) the 8” tall wheel wells to maximize headroom.
To achieve this we cut 7” tall vertical supports (strips) from ¾” plywood, which were then fixed vertically to the ¾” thick Truck Bed Sleeping Platform Base with vertical Kreg Jig joints in a toenail fashion shown in the diagram. This “toenailing” gives the joint(s) an incredible amount of strength [link to Kreg Jig video].
We used a speed square to ensure all the supports stayed as close as possible to 90 degree angles from the base and the 48” EXACT square to make sure the supports were straight from front to back.
**TIP: check your table saw or circular saw blade to make sure that the blade is set at a true 90 degrees. This will ensure your cuts are nice and square which will help the supports stay square when joining.**
From one ¾” thick 4x8 plywood board we cut:
3 Long Drawer Supports cut @ 7” tall x 71” long
3 Short Driver-side supports cut @ 7” tall x 11” long
2 Short Passenger-side supports cut @ 7” tall x 13 ½” long
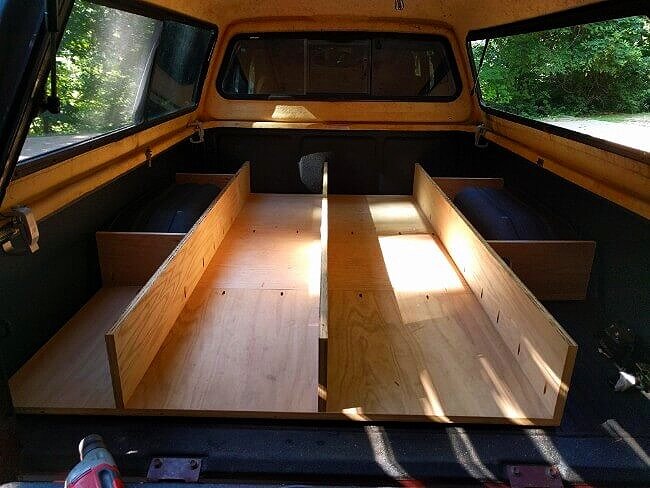
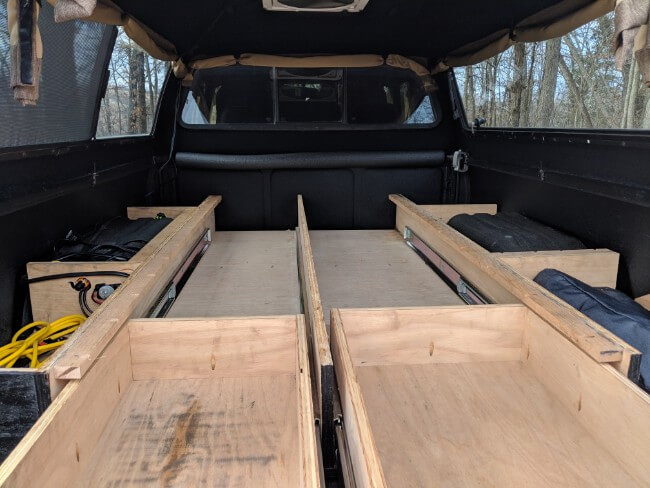
The short Driver-side and Passenger-side Supports (in front of and behind the wheel wells) were attached both vertically to the Platform Base and horizontally to the long Drawer Supports with Kreg Jig joints as shown in the picture below.
And as you can see on the right, a 4”x5” hole was cut from the rear Passenger-side support to allow for longer items (like my Tenkara fly rod!) to be stored alongside the passenger-side wheel well.
How To Build Truck Bed Sleeping Platform Drawers
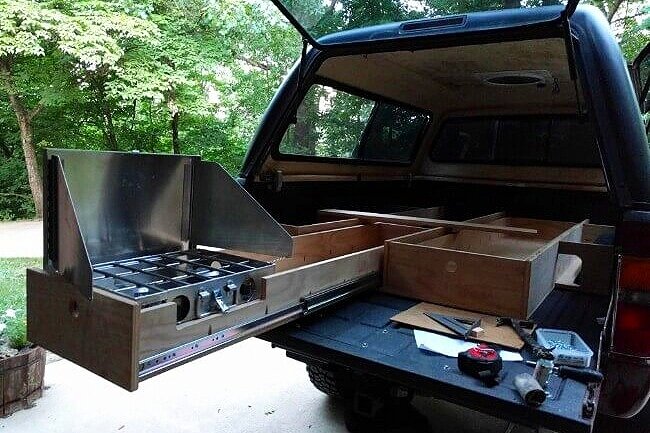
Though you could make your drawers any width you want by changing the position of the center drawer support to the right or left, we decided to make the driver-side drawer 13” wide (interior-width) to perfectly fit our Cook Partner stove.
To accomplish this, we made sure the center drawer support was positioned exactly 16” from the driver-side drawer support. We needed 16” to account for each drawer slide needing ¾” of space to mount and each drawer wall being ¾” thick plywood (total of 3”).
This left us with 13” of interior width in Drawer#1 to house our stove! Yay math!
This also left 18 ¾” between the center drawer support and the passenger-side drawer support, which meant that Drawer#2 would have 15 ¾” of inside width after accounting for ¾” for each drawer slide and each drawer wall being ¾” thick plywood (again, a total of 3”).
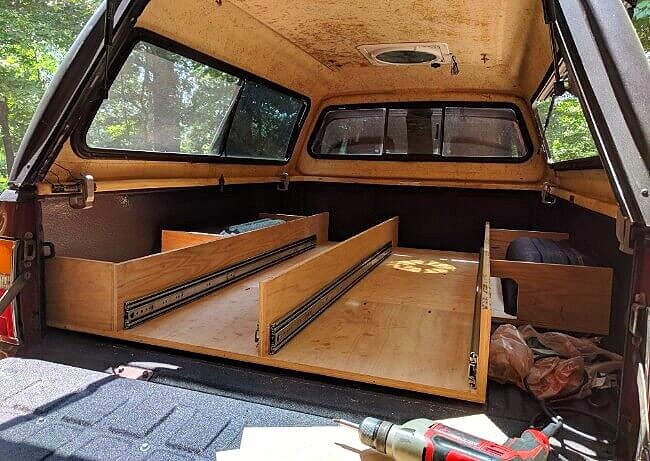
After triple checking all of that math, we then mounted the drawer slides to the drawer supports as shown in the above photo.
Note that they’re mounted 1” in from the end of the drawer supports.
This is to leave room for our drawer faces to close flush in between the supports (see the below diagram to see how the drawer faces sit inside the drawer supports when closed).
The Drawer Base is what we refer to the bottom of the drawer as.
The side and back walls of the drawer were cut and attached on top of the Drawer Base with vertical Kreg Jig joints in a toenail fashion as shown in the above diagram and photo below.
Then the Side Walls and Back Walls were attached to one another with Horizontal Kreg Jig joints.
From one ¾” thick 4x8 plywood board we cut:
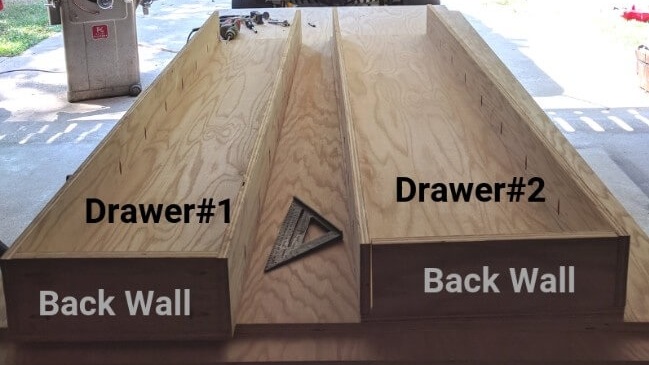
Drawer #1 Base cut @ 14 ½” wide x 70” long
2 Side Walls cut @ 5” tall x 70” long
Back Wall cut @ 5” tall x 13” long
Drawer #2 Base cut @ 17” wide x 70” long.
2 Side Walls cut @ 5” tall x 70” long
Back Wall cut @ 5” tall x 15 ¾” long
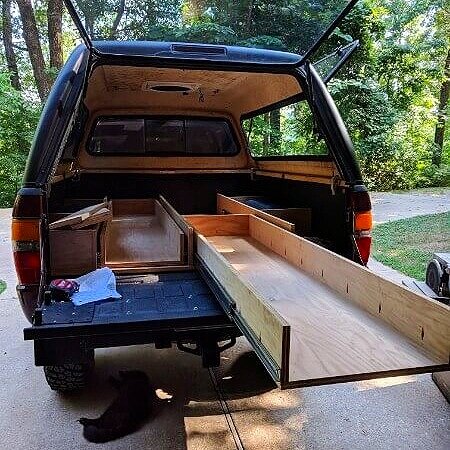
Once the three drawer walls (the two sides and back) were joined to the top of the drawer base and to one another, we were able to place Drawer #1 in between the drawer slides.
We then mounted the drawer to the slides per the manufacturer’s directions.
**A couple drawer slide mounting tips:
Lay a few 3/16” thick pieces of plywood under the drawers to lift the drawers off the Platform Base while mounting. This ensures clearance from the Platform Base, allowing the drawers to slide smoothly once fully installed.
The drawers were mounted virtually flush with the end of the drawer slides, as you can see in the below photos. By doing this, the Drawer Faces (once attached to the end of the drawers) will close flush in between the Drawer Supports.
Then we repeated this process with Drawer#2.
Finally we measured, cut, and attached the Drawer Faces to the Drawer Walls and Drawer Base with horizontal Kreg Jig joints.
For the Drawer Faces we cut:
Drawer #1 Face cut @ 15 ¾” wide x 6 ⅞” tall
Drawer #2 Face cut @ 18 ½” wide x 6 ⅞” tall
This is the width between the Drawer Supports (minus ¼” for clearance) x the height of the Drawer Supports (minus ⅛” for clearance).
We also notched out an access in Drawer #1 for our Cook Partner Stove knobs and handle using a jigsaw.
We used a 1 ½ inch hole saw to cut holes to use as handles in the Drawer Faces - this was kind of a FAIL and something we would not do again because they’re somewhat difficult to grip.
UPDATE: We ended up going with a set of these stainless drawer handles* and they work great!
Adding Support Width Additions for The Sleeping Platform Cover
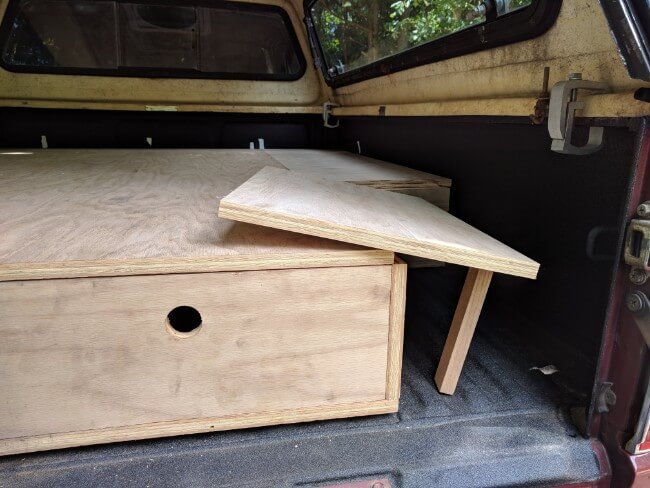
As you’ll see in the next section below - “Making The Truck Bed Sleeping Platform Cover” - we designed the Platform Cover to be four separate pieces of plywood that can easily be removed independently of each other.
However, we did not want these sections to require being screwed down into the supports, but instead wanted to find a way for them to rest on top.
We accomplished this by installing three Width Additions - 2”x1” oak boards - mounted flush with the top of three of the supports with horizontal Kreg Jig joints as shown in the diagram below.
This allows enough width for the cover sections to rest on securely without the need to screw them down, enabling us to easily and quickly remove the entire platform cover to access electrical or make repairs if needed.
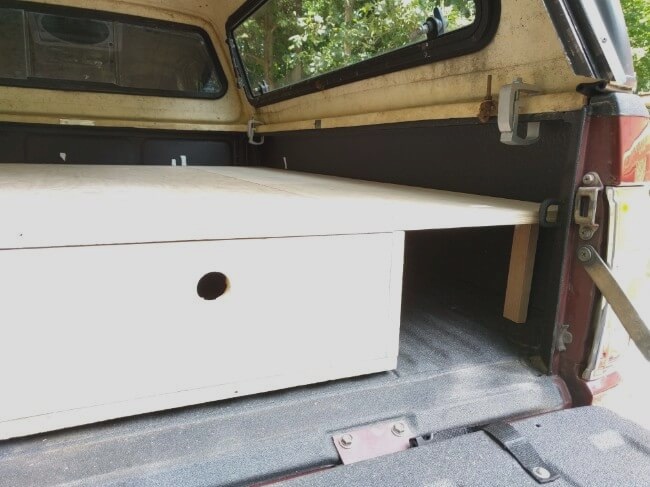
In the photos below you can see the two Width Additions mounted flush with the top of the 7” tall Drawer Supports.
These serve to support Platform Cover Sections # 1 and 3 (discussed below).
Notice that the 5” tall Drawer Walls slide underneath them with plenty of clearance.
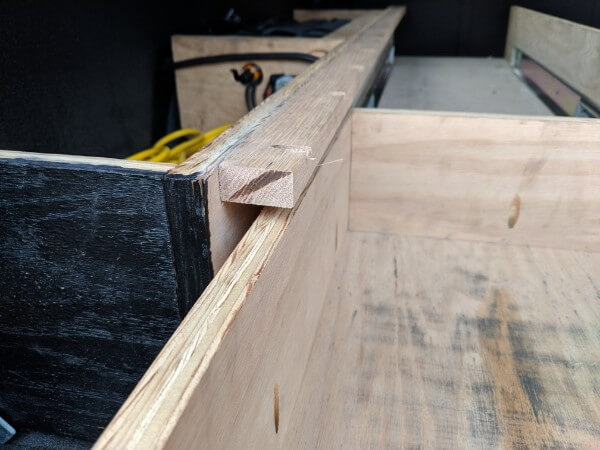
The photo below shows the 3rd Width Addition we added to the rear passenger-side support, which helps to support Platform Cover Sections # 2 and 4 (discussed below).

How to Make The Truck Bed Sleeping Platform Cover
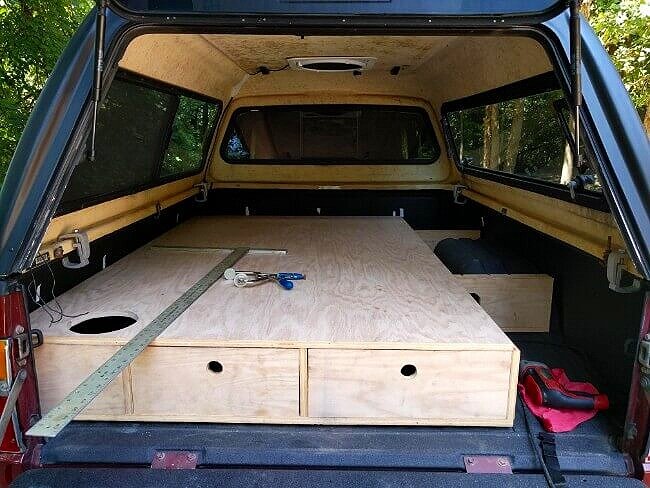
The Sleeping Platform Cover consists of 4 sections.
Sections #1, 2 and 3 were cut from one ¾” thick 4x8 sheet of plywood.
Section #4 was cut from a remnant from the drawer build.
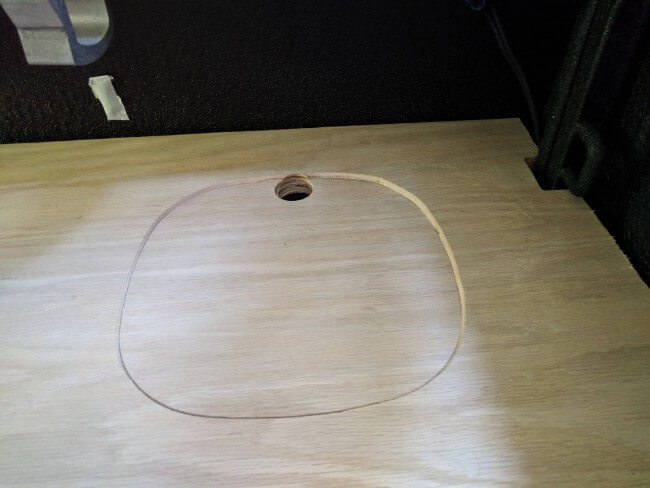
We drop cut a 9”x9” hatch into Sections #1 & #2 to access the storage spaces in front of the wheel wells.
First we used a 1 ¼” hole saw to create a hole to act as both the handle for the hatch lid and the opening for the jigsaw to cut out the rest of the hatch.
Then we used a tupperware container to trace a nice rounded square to follow with the jigsaw.
TIP: By setting the jigsaw to a 45 degree cutting angle while making the hatch cut out, it creates a nice beveled lip and a very simple lid.
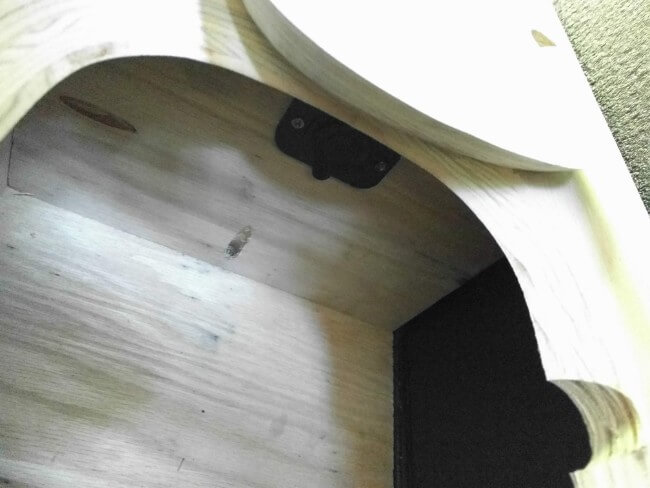
Section #3 was cut to provide easy access to the rear driver-side storage area and wheel-well.
This space houses our 12v distribution fuse block, Inergy Kodiak Solar Generator, and aluminum propane tank.

Section #4 serves as a removable cover for our dirty-shoe/gear storage.
When removed, this also provides a place for us to sit upright inside with our feet down.
A 7 ¾” long 2”x1” piece of oak left over from cutting the Support Width Additions was attached to the underside of this section vertically using a couple Kreg Jig joints.
This was done to support the rear most passenger-side corner of the section that would otherwise be unsupported.
Finishing The Truck Bed Sleeping Platform
While we had debated on staining the entire Truck Bed Sleeping Platform (it was built with cabinet grade red oak plywood afterall), we decided to use Duplicolor roll on truck bedliner* for a couple reasons:
It provided more durable protection for the surface of the Sleeping Platform while hauling stuff around when we’re not truck camping
It is easily repairable - you literally just brush it on
It was WAY easier than staining and sealing that much surface area
Each of the four Platform Cover Sections and the hatch lids were removed and bedlined separately, and the drawer faces, rear-facing surfaces of the supports, and platform base were done at the same time. We did not bedline any unexposed surfaces.
Everything was left to cure per the manufacturer’s recommendations, and then reassembled.
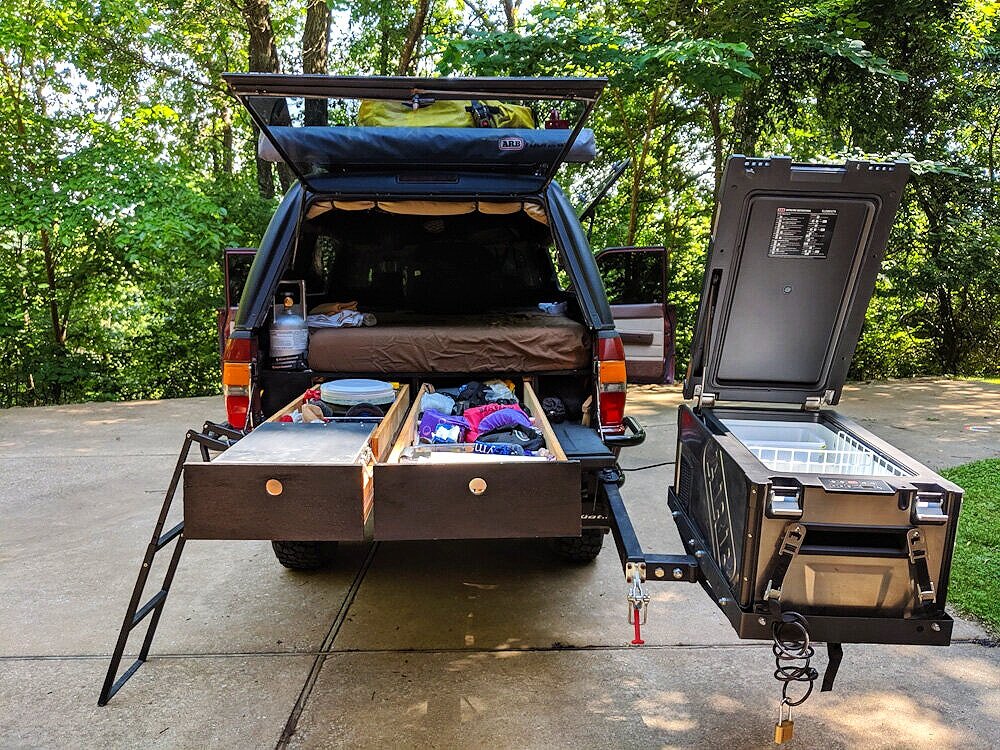
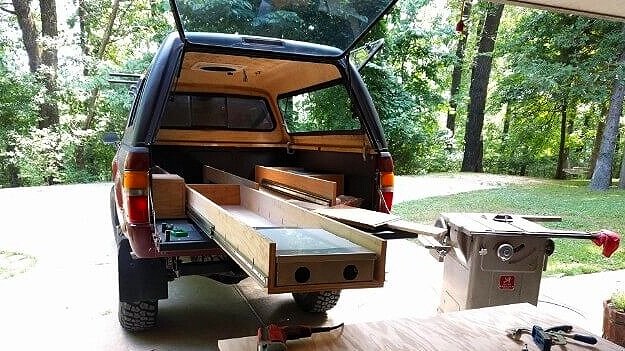
Here’s A walk-through of the Completed Truck bed Sleeping Platform
All-in our truck bed sleeping platform took about 3 long days to build.
Having the right tools, measuring everything multiple times to ensure cuts were accurate, and taking our time was crucial to making this DIY truck bed sleeping platform a success!
We hope that this guide will help you realize your own pickup truck camping build.
If you’re not sure this truck camping setup will work for your needs - or you’re looking for an alternative build that incorporates some more modular storage - our Homemade DIY Truck Camper Build or our guide on How to Build an Aluminum 8020 Truck Bed Sleeping Platform [with Drawer Storage] may be right for you. Both are great for solo truck camping setups in a traditional camper shell or to optimize a truck camping setup with one of the newer wedge campers or one of the other 25 Best Lightweight Small Truck Campers.
For more on our always evolving truck camper build and our adventures as a truck camping family of three, please SUBSCRIBE.
And if you have any questions please hit us up in the comments section, or via email - we’d love to help you make your truck bed sleeping platform build a success!
Don’t forget to grab the free printable PDF of all the diagrams by clicking below, if they’ll help you in your build!
As always, thanks for reading!
Related Posts:
Want to come back to this post later? Pin it!